What if there was a platform where you could edit code, test a library, a framework, or a component, and watch the changes happen right before your eyes? And what if you could share your experiments with other developers or copy from them to improve your coding skills, debug your work quickly, and find inspiration?
I tried a tool that makes software developer's lives a lot easier: CodePen, self-described as "a social development environment for front-end designers and developers".
This article will explain what CodePen is, what you can do with it and how, and why it can be a very useful tool to speed up your front-end development.

CodePen is a development platform where anyone can edit front-end languages like HTML, CSS, and JavaScript from their browser without downloading any software.
The best part is that results can be seen in real-time, allowing for quicker debugging. Developers and designers can also create and share code snippets (called pens) with the rest of the world.
What is CodePen used for
Gathering or sharing ideas
Thanks to the great community that CodePen has built, there are thousands of users creating and sharing their ideas of front-end components, animations and even almost finished layouts of web pages. If you have some ideas of your own that might be useful to other front-end professionals, this is the perfect place to share them. All you need is to make sure your code is free from copyright.
Style-guide your project
If you're not interested in using other people's code, you can always use CodePen's online code editor to create the style for your project components. This way, you can ensure yours are not influenced by code intended to style other components. You can think of it as a blank canvas.
I recommend creating a pen for each component as you'll be working with less code each time. This way, you're preventing mistakes (like changing code for one component that destroys another) and only realizing it in the end.
Learn a new framework or library
CodePen's browser-based editor is a great tool to test and run a new framework or library. You don't need to set up a new environment every time you want to see if your changes work. The editor view simultaneously shows the three editing areas and the preview, updating the final results every time something changes.
How CodePen works
Now that you know what CodePen is used for let's explore how it works. The platform is very user-friendly and packs a lot of features. Some can even go unnoticed, even if you have already used it several times.
Search for pens
Right on the main page, you get a glimpse of what you can search: specific pens, people, projects or collections. You can also check CodePen suggestions (it is a great option to see other people's code and learn some tricks), or you can hit the search bar to look for something more specific. If you are quick to write and press enter, you probably won't notice that you can explore topics! They are organized into three different categories:
- Frameworks
- Libraries
- UI patterns
Each topic has a page where you can explore pens, templates, and resources. The list of topics is closed, but you can fill a form and ask for a specific one.

If you look at the examples, you'll see a screenshot of the pen to quickly preview the final result and consider if it is something worth your interest.
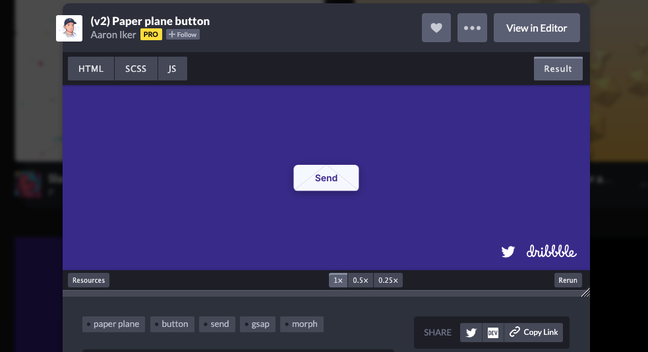
Then you can either click directly on the pen and open the Editor View (where you can play with the code) or click on the expansion arrows on the right upper corner, to open the Details View. This view will let you comment on the pen, like and follow the author, see and interact with it, like this pen where you can play the xylophone.
You can also pin it to see it or use it later. On the navigation bar inside the Your section, those pens will show on the pinned items group.
Code Editor
The Code Editor is my favorite part of CodePen. With this tool, you can see the HTML editor, the CSS editor, and the Javascript editor simultaneously along with the preview, that automatically updates as you change the code.
There's no need to change between file and browser tabs, which makes the coding process quicker. Besides, if you don't need one of these sections, you can hide it by adjusting its size.
You can always customize the layout of your pen. The standard view has the three code sections on top and the preview at the bottom. But if you need more height in your preview, like a mobile version of a web app, you can change the layout under the Change View menu and align the code sections vertically.
Framework, libraries & preprocessors
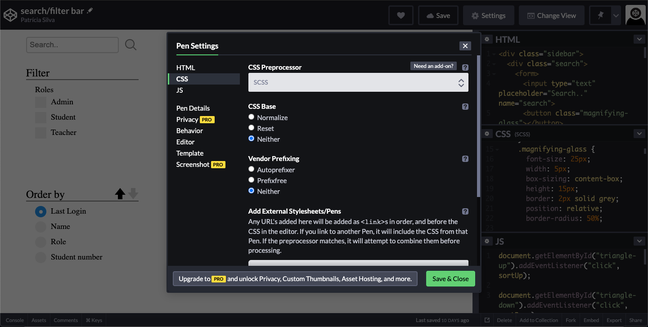
Like I've mentioned previously, CodePen lets you work with more than just pure HTML, CSS, and Javascript. To include any other framework, library, or preprocessor, go to Settings. You will find a tab for each one of the code sections, with options to change the preprocessor and include external sources, like stylesheets or scripts.
If, by any chance, you are more familiar with Haml than pure HTML, select Haml on the first dropdown menu. If you want to use Bootstrap on your pen, go to the external stylesheets of the CSS section, type "Bootstrap", select the option you want to use and include as many sources as you need! It truly is very simple to set up a pen.
Other settings
On the settings, you can also:
- Edit pen details (quite useful when sharing your creations with the community)
- Make a template out of your pen
- Change how many spaces or tabs your code's indentation has
- How the pen will be saved
- Change your pen to private (pro users only)
- Add a personalized screenshot (pro users only)
In addition, you still have access to other features of the Code Editor, including assets for pro users, a debug console, and the full list of project export options.
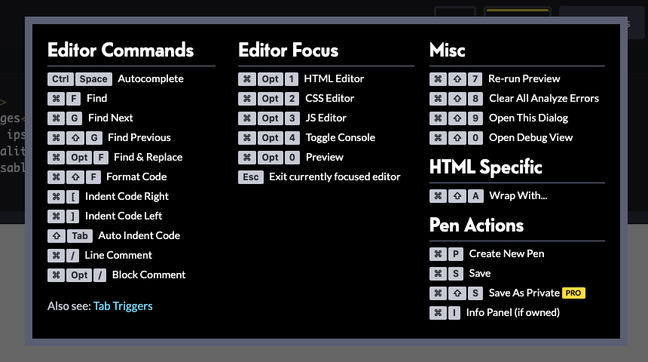
One of the most interesting and unnoticed buttons on the Code Editor is "keys". Here you'll find the complete list of shortcuts available on CodePen, including the Auto-complete feature that, just like me, you probably thought didn't exist.
How to add images on CodePen
If you are a CodePen Pro user, adding an image is a three-step process:
- Access the "Assets" on the footer.
- Add your image if you haven't previously.
- Copy the URL to use in your code.
If, just like me, you are using the free version of CodePen, you’ll have to host your photo somewhere online to have a link ready to use. Some of the options available are Imgur , ImgBB but there many other websites that offer free hosting for your photos. Upload the image you want to use and copy the link. Now you can place it as an img src, background-image, etc.
How to download your code
The easiest way to download your pen is to copy & paste the code into your project. That's what I usually do. Nevertheless, you can export the pen as a zip file or as a Github gist.
"Export" is the second button counting from the right on the footer (if you can't see it, save your pen first). Click on it and select your favorite option.
CodePen for React
If you're asking "Can I use React on CodePen?", the answer is "Yes!". If you're using any other JavaScript library, the answer will also be yes in almost 100% of the cases.
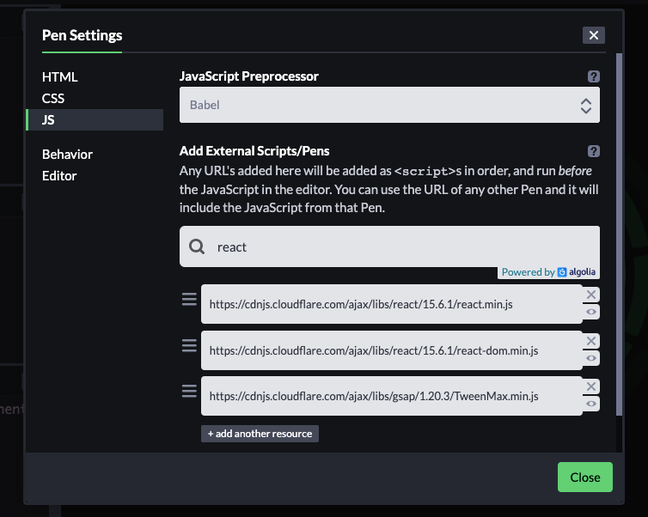
To use React on CodePen, you need to access the settings of your pen and select the JS tab. If you open it and look at the options of the first dropdown menu, you won't see React, only the readily available preprocessors.
To add React to Codepen you need to select the combo box on "Add External Scripts/Pens" and write "React" to show all the available options. Choose the ones you need, and you are ready to code!
Flutter and Vue on CodePen
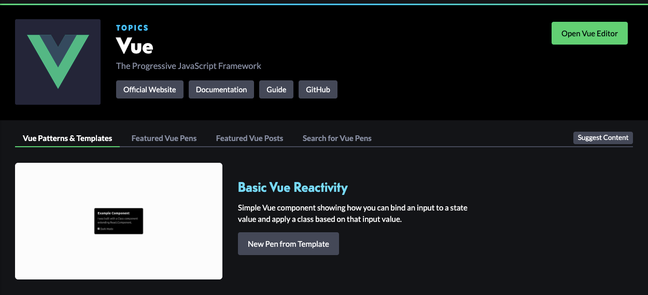
On CodePen, it's also possible to use Flutter and Vue, but you won't be able to select them just like you did with React. Remember the topics when I explained how to search on CodePen? It's only through them that you can access Vue and Flutter personalized editors.
Go to the "Explore Topics" page, select the one you want, and, on the right top corner, you'll find the "Open editor" button. You'll only have two sections on these editors: one for code and the other for preview.
How to share CodePen's code
You can share your pen using the social media share button or the embedded functionality.
Sharing your CodePen on social media can be done directly from the "Details View" or the last button on the Editor View's footer. To share using the embedded code, you have to select "Embedded" on the Editor View's footer (third option from right) and copy the generated code.
This method is great if you want to show your pen on a website while incorporating the Details View.
Warning: if you want to share another person's pen, make sure to copy it first. Use the "Fork" feature (fourth option from the right of the Code Editor's footer) to copy the pen exactly as it is. You never know if the author will delete the pen or change something in the code.
How to convert your code to regular HTML, CSS, or Javascript
Don't worry if you use SCSS instead of CSS, but your project only supports regular CSS. You have the option of transforming it with just one click.
On the arrow at the right upper corner of your selected code section, you have the option to "View Compiled ...". All you have to do is click on it, and it's done.
Don't be afraid to do it; you can change it back. When you download the code, you will also see a folder with the compiled version inside.
Why use CodePen to accelerate your front-end development
CodePen is great for editing code and seeing the results in real-time, while it allows you to learn code effectively. If you're starting a new front-end development project, here are the main reasons why you should use CodePen.
It’s free
What else do I need to say? You can do all that I've mentioned above without having to pay anything. If you want to, you can Go Pro and pay a monthly subscription to access additional features like private pens, personalized screenshots, assets, and more view layouts.
I have a free account, and I didn't need these extra features so far.
You don't need an account
If you don't want to create an account, you don't have to. You can still search and use the Code Editor. However, you won't be able to save your pens to revisit them later. So, if you only want to test a couple of things, you can do that without an account.
Three code editors and real-time preview
One of the main advantages of CodePen is the ability to see everything on a single screen. Not having to skim through browser tabs or file tabs makes my coding faster and easier. In addition, it gives a real-time preview, which cuts the time of reloading pages every time we need to see the outcome of the code changes.
Using more than simple CSS, HTML, Javascript
CodePen is a code editing tool where we can use pre-made preprocessors, libraries, and frameworks, making our life easier. We can do that in just a few clicks and set up a pen with whatever language we want to use. How great is this?
Examples of everything
If you need to find examples of something previously done, you will probably find them! Animations, elements, full pages, you name it. CodePen has it!
CodePen was a tremendous help for my dissertation project, where I had to create a whole new front-end for an existing project. I use it every time I want to learn something new like React and Animations or test a library/framework/component in isolation.
When using CodePen, I'm not worried about existing code. It gives me the freedom to create UI components at ease and apply them to the project's code, risk-free.
As a software developer at Imaginary Cloud, I feel this is one of those tools that can truly accelerate your development as a coder. Try it out!


0 Comments